Editing Source Files
Editing COBOL Files
You are going to explore some of the COBOL editing features using the ZBNKPRT1.cbl program which produces a report from a sequential data file.
- In the Team Developer Tree view, double-click ZBNKPRT1.cbl in the Sources/cbl folder of the project.
- Copybooks
-
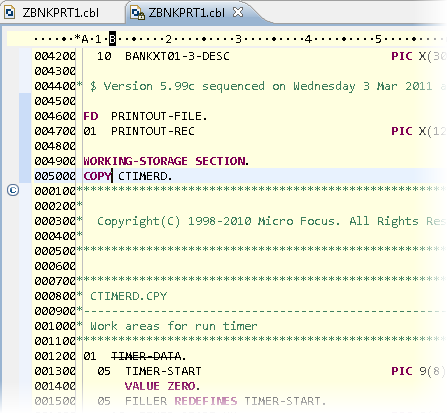
- Scroll down the file until you see some COPY statements.
- Press
F4 to open the file in COBOL Copy View, which shows the code of the copybooks expanded in the source file.
The COBOL Copy View is read-only and you cannot edit the code in it. The screen background changes from white to pale yellow.
- Press Ctrl+F4 to close the COBOL Copy View.
- To edit a copybook, position the cursor on the COPY statement and press F3 (Go To Definition).
- Copybook Dependencies
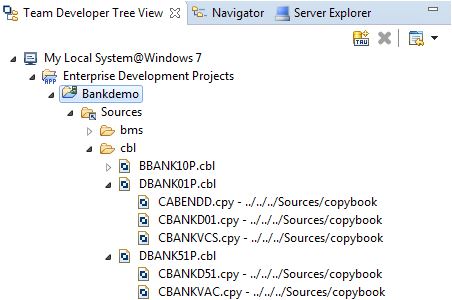
- By expanding a source file node in theTeam Developer Tree view, you can see a list of all copybooks referenced in the source code, and nested within them any other copybooks referenced by those copybooks. Double-click a copybook to open it in the Editor.
Use the Copybook Dependency view to show where in the source file's structure the COPY statements appear, and which copybooks they reference. If the Copybook Dependency view is not displayed in the Team Developer Perspective, add this view using Window > Show View > Other > Micro Focus > Copybook Dependency from the menu bar.
Click a copybook reference in the Copybook Dependency view to locate the associated COPY statement at the appropriate line in the source code.
- Unused data
- Notice that some data items in the Data Division are crossed out. This is because they are not referenced in the Procedure Division.
- Program outline
-
- Right-click anywhere in the COBOL editor and select
Quick Outline.
This opens a pop-up with the outline of the program similar to what the Outline view shows.
- Press Ctrl+O in the pop-up to see a more detailed outline similar to the Program Outline view.
- Double-click an item in the outline to see how the cursor positions itself on the line of code that this outline item refers to.
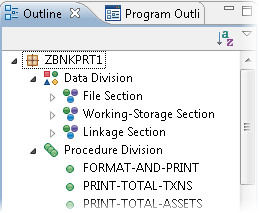
- Click on the permanent Outline view.
- Expand and collapse various lines in the Outline view.
- Double-click items in the Outline view to see how the cursor positions itself on the respective line of code that each one of these outline items refers to and highlights the referenced item in the editor window.
- Click the Sort button (
 ) for the Outline to toggle between a physical or alphabetical sequence.
- Right-click anywhere in the COBOL editor and select
Quick Outline.
- Hyperlinks
-
- In the editor, scroll down the file to a line in the Procedure Division.
- Press and hold
Ctrl and move your mouse around the code.
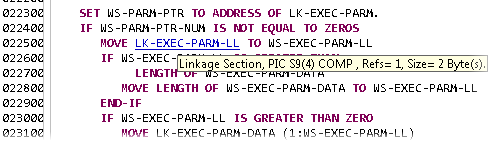
This turns the data items and the paragraph names you hover over into hyperlinks.
- Click one of the hyperlinks to position the cursor on the definition of the respective data item or paragraph.
- Viewing data definitions
- Breadcrumbs
- The Toggle Context Breadcrumbs icon (
 ) in the toolbar lets you see another view of the program showing the copybooks.
- Marking text and block mode
- You can either use the mouse to mark a block of text or click
 to enable Toggle Block Selection Mode and select square blocks of text. When a selection is made, you can cut or copy it.
- Smart editing
- There are many more features which you may wish to explore for yourself but the last one we are going to look at is Smart Editing with background COBOL parsing.
- Scroll down to line 025000 in the code and start typing the following, starting in area A of the code, one character at a time:
MOVE W TO
Notice how the words you type change in the editor. Once a word is recognized as a reserved word or a data item, its color changes. If a line of code contains invalid COBOL syntax, a red cross appears to the left of the line and the word is underlined with a wavy red line.
Also, if you have not changed the IDE preferences for Content Assist, it automatically displays a pop-up with suggested keywords and names of data items appears as you type.
- Change the line to:
MOVE 34 TO WS-
If the IDE preferences for auto-activation of Content Assist have not been changed, Content Assist opens a list of potential data names that start with WS- to choose from. If Content Assist does not display a list, to open it manually click Ctel+Space.
- Finally, if you have changed this COBOL program, copy the backup version back in again.
- Scroll down to line 025000 in the code and start typing the following, starting in area A of the code, one character at a time:
- Renumbering the COBOL sources
- You can use the commands
Renumber and
Unnumber to insert and remove line numbers from your code. Your sources include some comments beyond column 73, so you need to configure the line numbering in order to ensure you only apply changes to the COBOL sequence area:
- Click Window > Preferences > Micro Focus > COBOL > Editor > Line Numbering.
- Ensure that only the COBOL (left-hand margin) option is enabled.
- Click OK.
You can now remove the line numbers from your code:
- Right-click the
ZBNKPRT1.cbl file in the editor, and click
Unnumber (or, alternatively, click
 in the Eclipse toolbar).
To reinsert the line numbers in your code:
- Right-click the
ZBNKPRT1.cbl file in the editor, and click
Renumber (or, alternatively, click
 in the Eclipse toolbar).
To insert line numbers beyond the end of area B:
- In the IDE preferences for line numbering, check Standard (right-hand margin).
- Click OK.
- Right-click the
ZBNKPRT1.cbl file in the editor, and click
Renumber.
You should now see line numbers running down both sides of the source code:

- Click Edit > Undo Typing as necessary to revert your changes to the file.

BMS editing
There are two ways to edit BMS files. The first one is to use the basic BMS text editor available in the IDE. The other is to use a WYSIWYG version, the Micro Focus BMS Painter, which is available as a separate utility installed with this product.
To open the BMS file in the IDE text view:
Although you can use this basic text editor to make small changes, it is quite difficult to edit BMS files in text view.
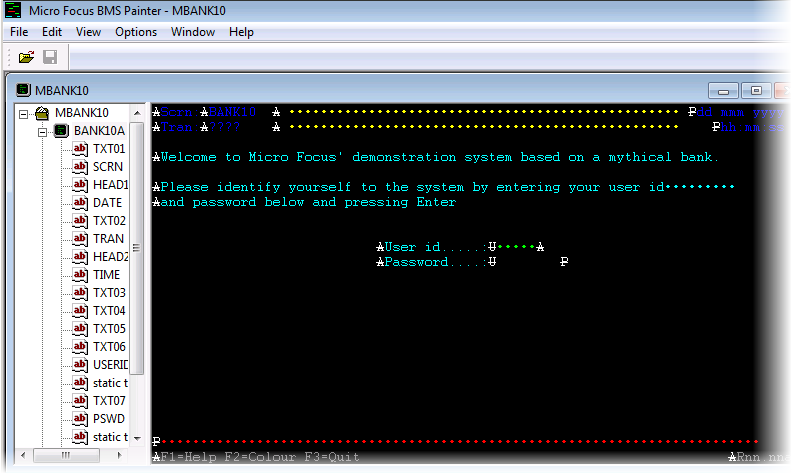
A much more suitable and less error-prone way to edit BMS files is to use the BMS Painter.
- Close the BMS text editor. In the Team Developer Tree view, right-click MBANK10.bms in the BMS Source Files folder and click .
- In BMS Painter, you can click fields and move them by dragging.
For example, double-click the data field immediately following the text “User Id” and move it to a different position on the map.
- To add a field, click in the desired place in the window and start typing.
- To change a field's properties, right-click it and select Properties.
- To change the properties of the map or mapset, right-click the item and select
Properties.
For example, do this for the MBANK10 mapset and the BANK10A map.
- Click to close the utility and do not save the file.
Editing data files
You can edit data files using one of two available Micro Focus Data File Editor tools.
- Double-click the data file in the Team Developer Tree view to open it with the editor you have used during your last edit session. By default, this is the Classic Data File Editor.
If you want to select the Micro Focus Data File Editor, use the context menu as follows:
- In the Team Developer Tree view, right-click the .dat file and click Open With. Here you can select either the Classic Data File Tools or the Data File Tools.
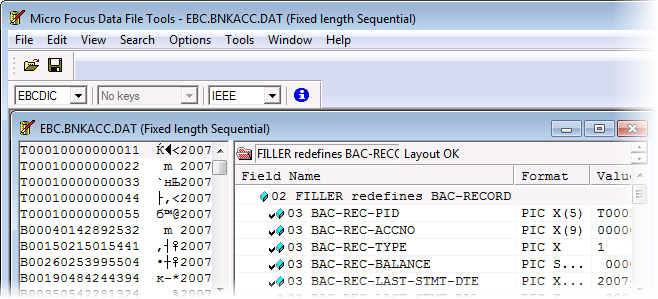
- The
Classic Data File Editor opens the data file and shows two views:
- The left-hand pane shows the raw form of the file. Because many of the field are COMP-3 fields, the data in these fields is presented in an ASCII view.
- The right-hand pane shows the record layout for the file in its detailed field view and the COMP-3 fields are shown in a much better, editable form.
- Change the value of BAC-REC-BALANCE from 91.14 to 132.76 as follows:
- Double-click in the Value field for BAC-REC-BALANCE. You may get an Update warning dialog box when you start typing the new value.
- Click Yes to confirm you want to make changes.
- Position the cursor in front of the third number before the decimal point and start typing.
- Press Enter to confirm the change.
- Close the Classic Data File Tools utility without saving your changes.