Create a Service Interface
In this section of the tutorial, you use Enterprise Developer and the Interface Mapper to create a Web Services type service interface from the MFS screens in the MFDEMO application.
Create the IMSScreenWS Service Interface
- From the Solution Explorer in Enterprise Developer, right-click the IMSTutorial project; then click Add > New Item.
- In the left pane, expand COBOL; then click Native.
- In the center pane, click Service Interface.
- In the Name field, type IMSScreenWS; then click Add.
- On the Service Interface dialog box, select Web Service from the Type of interface drop-down list. This automatically sets the SOAP transport type.
- In the Type of source field, select IMS Screen; then click OK.
At this point, Enterprise Developer adds the IMSScreenWS service interface to the Solution Explorer and invokes the Interface Mapper.
Define IMSScreenWS Operations
Each service interface you create is comprised of a set of operations. For an IMS Screen service interface, most operations address a screen encountered by the program. Others address initialization and termination of the service.
The MFDEMO application is not conversational, meaning it does not maintain state. You could successfully deploy, run, and access your service without providing a way to terminate the application from a terminal. However, if this IMS application were a conversational application, you would need to add this functionality. To show how this is done, this section walks you through the process of defining the service interface to behave as if it were accessing a conversational application, enabling it to:
- Connect to the MFDEMO application
- Query a table in the database
- Show the returned data
- Exit the application
- Terminate on an error at any stage
Create the following operations to accommodate these requirements:
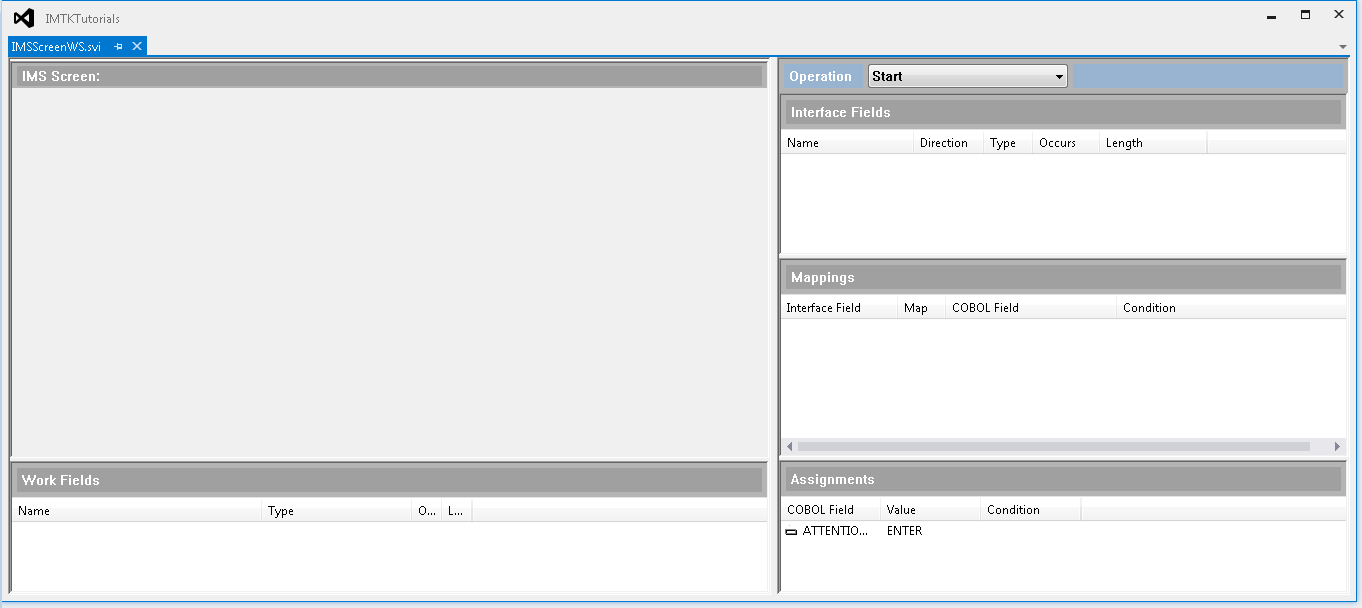
- Start operation
- The purpose of the Start operation is to initialize the MFDEMO application by sending the transaction ID and simulating the pressing of the
Enter key.
- From the
Interface Mapper, click
Operation >
New.
This opens the Operation Properties window where you specify general information for the new operation.
- In the
Operation Name field, type
Start.
Because this is the operation that initiates the service, there is no active screen or previous screen to specify.
- Leave the default values in the
Active Screen and
Previous Screen fields.
The name of the transaction that initiates the MFDEMO application is MFDEMO.
- In the
Transaction ID field, type
MFDEMO; then click
OK.
To actually initiate the transaction, a user would need to then press Enter. To simulate this action, you create an ATTENTION ID assigned to the Enter key. ATTENTION ID defines which AID key (for example, Enter, PF8, etc.) to use.
- Right-click anywhere in the Assignments pane; then select New Assignment from the popup menu.
- From the Assign to drop-down list, click ATTENTION ID.
- From the Field 1/Operand 1 drop-down list, click ENTER.
- Click OK.
- Click File > Save IMSScreenWS.svi to save the service interface.
- From the
Interface Mapper, click
Operation >
New.
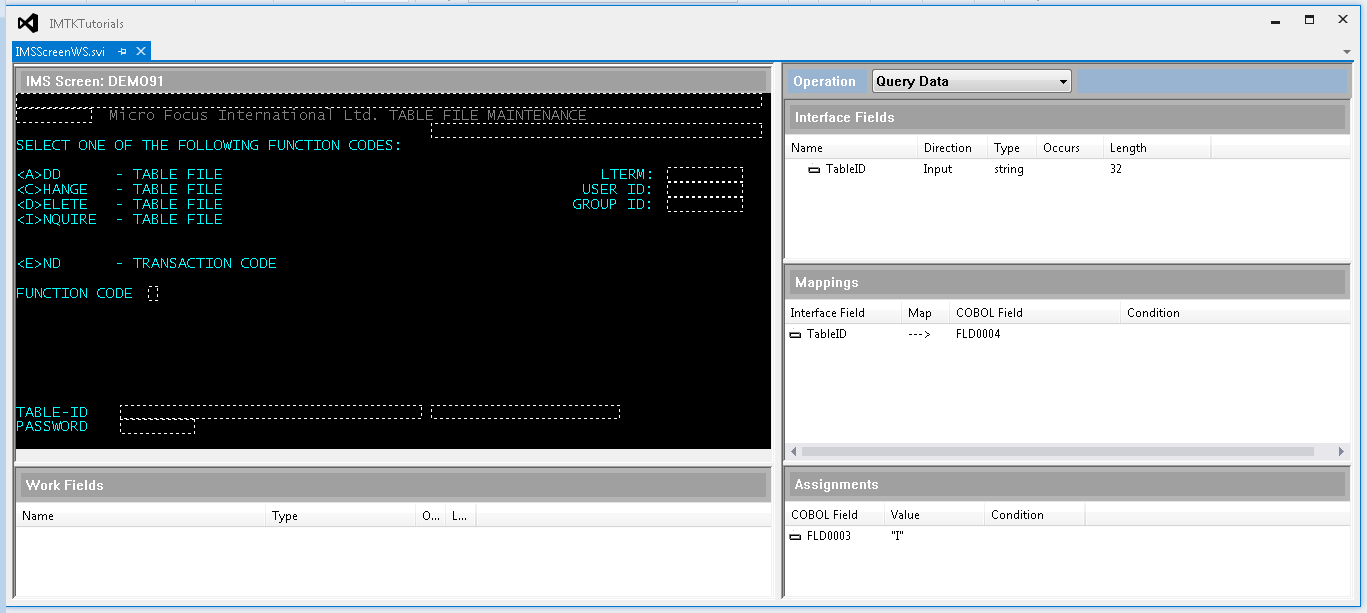
- Query Data operation
- The purpose of the Query Data operation is to send a query instruction to the application and to provide a return path to the application's main menu.
- Create the Query Data operation
-
- Click Operation > New.
- In the
Operation Name field, type
Query Data.
Now you want to set the active screen that shows the main menu of the MFDEMO application. The name of this screen is DEMO91.
- From the
Active Screen drop-down list, click
DEMO91.
DEMO91 is the first screen you want to access, so no previous screen exists.
- From the Previous Screen drop-down list, click <None>.
- Leave
Transaction ID blank.
You could have the Interface Mapper create default mappings for you, but in this tutorial you want to create the mappings yourself.
- Leave Create Default Mappings unchecked.
- Click
OK.
This returns you to the Interface Mapper and shows the IMS Screen DEMO91 in the IMS Screen pane.
- Create an assignment
- To query the database you need to provide the application with a function code of
I (for Inquire). You do this by assigning a value of
I to the appropriate field.
- On the
IMS Screen: DEMO91 pane, hover over the entry field located to the right of the
FUNCTION CODE label.
A popup indicates that the name of this field is FLD0003. You need to know the name of this field so you can create an assignment for it.
- In the Assignments pane, right-click; then click New Assignment.
- From the Assign to drop-down list, select FLD0003.
- In the
Field 1/Operand 1 field, type an upper-case
I, then click
OK.
The Assignments pane now shows that FLD0003 is set to a value of I.
- On the
IMS Screen: DEMO91 pane, hover over the entry field located to the right of the
FUNCTION CODE label.
- Create an interface field
- You also need to provide your users with a field into which they can type the table ID for the table they want to query. You do this by creating an interface field based on the original input field on the DEMO91 screen.
- On the IMS Screen: DEMO91 pane, locate the input field to the right of the TABLE-ID label.
- Click and drag this field to the
Interface Fields pane and drop it there.
The name of this field, FLD0004, is not particularly descriptive. Because this field is really the input field for the table ID, you can rename it in the Interface Mapper so that it is more recognizable. The name used here appears as the field label in your generated clients.
- In the Interface Fields pane, double-click FLD0004.
- In the
Name field, type
TableID.
The original FLD0004 field is defined as an input/output string. By default the Interface Mapper has defined this service interface equivalent as an input string, which is what you want here. No further adjustments are necessary.
- Click
OK.
Notice that the Interface Fields and Mappings panes now show the interface field with its new name, TableID. The Mappings pane shows that the TableID interface field maps to the FLD0004 COBOL field.
- Assign an ATTENTION ID
- Once again, if your end user were interacting with the application on a terminal, they would have to press the
Enter key to send the table ID to the application. For the service interface, this requires that you create an ATTENTION ID assigned to the
Enter key.
- Right-click anywhere in the Assignments pane; then select New Assignment from the popup menu.
- From the Assign to drop-down list, click ATTENTION ID.
- From the Field 1/Operand 1 drop-down list, click ENTER.
- Click OK.
- Click File > Save IMSScreenWS.svi to save the service interface.
- Show Data operation
- The Show Data operation displays the data requested by the Query Data operation.
- Create the Show Data operation
-
- Click Operation > New.
- In the
Operation Name field, type
Show Data.
In this operation, you want display information from the screen that shows the returned data. The name of this screen is DEMO92.
- From the
Active Screen drop-down list, click
DEMO92.
Because this operation requires input provided by the Query Data operation, you need to provide the name of the screen used in that operation, DEMO91. This establishes that the path to the active screen is through the DEMO91 screen.
- From the Previous Screen drop-down list, click DEMO91.
- Leave the Transaction ID field blank.
- Leave Create Default Mappings unchecked.
- Click OK.
- Group Map Fields
- The MFDEMO application displays information returned from the database on the DEMO92 screen in a series of three columns across. You can simplify the service interface definition for these fields by grouping them using the Map Annotation Editor. Once grouped, you can reference grouped fields as an array when you define them in the operation.
- In the IMS Screen: DEMO92 pane, hover the mouse over the left-most field that appears in the first row, just below the FUNC label.
- Now hover your mouse over the right-most field that appears in the last row, just above the NEXT-ELEMENT label.
- From the Solution Explorer, right-click DEMO92.mfs; then click Edit Annotations for Services > Map DEMO92. This starts the Map Annotations Editor.
- Scroll down the list of fields until you find FLD0014; then click this field to select it.
- Continue scrolling down until you find FLD0052. Hold the Shift key down and click FLD0052 to select it and all of the fields listed between it and FLD0014.
- Move your mouse to the selected area in the Map Annotations Editor; then right-click and select
Group from the popup menu.
You want to group the fields just as they are displayed on the DEMO92 screen. Therefore, the number of fields in the resulting array needs to match the number of columns on the screen, which is three.
- In the Number of fields in the group field, type 3.
- In the
Group name prefix field, type
RETURN.
This prefix along with a generated group identifier (for example, GRP1) becomes a parent to the fields in the group.
- Click
OK.
In the Map Annotations Editor, you now see that the parent for the grouped fields is RETURN-GRP1, and that this group occurs 13 times as is shown in the Occurs column. The three fields listed below the parent each bear the name of the first field in each column that appears across the screen, appended by Grp. The direction for all fields is defined as Input/Output.
- Click
File > Save DEMO92.emp to save your changes; then close the tab containing the Map Annotations Editor.
The rendering of the DEMO92 screen in the Interface Mapper is automatically updated with these changes to the map.
- Create interface fields
- With the fields we need from the DEMO92 screen identified and grouped, you are now ready to define the interface fields that receive the returned data. In this case, you don't need to display the FUNC data from the first column on the screen. You are only interested in showing the data from the ELEMENT KEY and ELEMENT VALUE/DESCRIPTION columns.
- From the
IMS Screen: DEMO92 pane, click and drag the following fields to the
Interface Fields pane, and drop them there:
- FLD0015Grp - located under the ELEMENT KEY label
- FLD0016Grp - located under the ELEMENT VALUE/DESCRIPTION label
By default, the Interface Mapper assigns the Input direction to interface fields created from IMS screen Input/Output fields. Therefore, each of the interface fields you have just created is defined as an Input field. However, because you want to use these fields to show data returned from the IMS database, you need to redefine their direction to Output.
In addition, you should also rename each of the fields to something more meaningful as the names you assign here appear as field labels in your generated clients.
- From the Interface Fields pane, double-click FLD0015Grp.
- In the Name field, type ElementKey to rename the field.
- Click Output to change the direction of the field.
- Click OK.
- Repeat steps 2 through 5 for the FLD0016Grp field, changing its direction to Output and renaming it to ElementValue.
- From the
IMS Screen: DEMO92 pane, click and drag the following fields to the
Interface Fields pane, and drop them there:
- Create mapping conditions
- To prevent your client from displaying null values, which can show up as garbage characters, you can create mapping conditions that prevent the output fields from accepting null values from the application.
- From the Mappings pane, right-click ElementKey(*), then select Apply Condition from the context menu.
- In the New Name field, type KeyNotNull; then click Create.
- From the Field drop-down list, select RETURN-GRP1.FLD0015Grp(13).
- In the Field field, replace the 13 with an asterisk to represent all occurrences.
- From the Operator drop-down list, click >=.
- In the Field or Literal value field, type " " (double-quote followed by a space and another double-quote).
- Click OK to close the Condition Editor, and OK again to close the Apply Condition dialog box.
- From the
Mappings pane, right-click
ElementValue(*); then select
Apply Condition from the context menu.
Because the condition you're creating here is so similar to the condition you created for ElementKey, you can use the condition you created for ElementKey as a starting point.
- From the Existing Condition drop-down list, select KeyNotNull.
- In the New Name field, type ValueNotNull; then click Create.
- From the Field drop-down list, select RETURN-GRP1.FLD0016Grp(13).
- In the
Field field, replace the
13 with an asterisk to represent all occurrences.
The rest of the condition definition is the same as for KeyNotNull and is already populated in the appropriate fields.
- Click
OK to close the Condition Editor; then click
OK to return to the
Interface Mapper.
The Condition column in the Mappings pane now shows the conditions you defined.
- Click File > Save IMSScreenWS.svi to save the service interface.
- Create Assignments
- To enable this service interface to terminate the application as if from a terminal, you must add assignments to the Show Data operation that return the application to the DEMO91 screen, which is the main menu for the MFDEMO application. When done from a terminal, a user would type an
X into the
NEXT FUNCTION: RETURN field, and then press
Enter. To do the same in your service interface, you assign the string value
X to the
FLD0056 field, which is the name of the field labeled NEXT FUNCTION: RETURN, and then assign an ATTENTION ID for the
Enter key.
- In the Assignments pane, right-click; then select New Assignment from the context menu.
- From the Assign to drop-down list, select FLD0056.
- In the Field 1/Operand 1 field, type X, which is the value that tells the application to return to the main menu screen.
- Click OK.
- In the Assignments pane, right-click and select New Assignment from the popup menu.
- From the Assign to drop-down list, click ATTENTION ID.
- From the Field 1/Operand 1 drop-down list, click ENTER.
- Click OK.
- Click File > Save IMSScreenWS.svi to save the service interface.
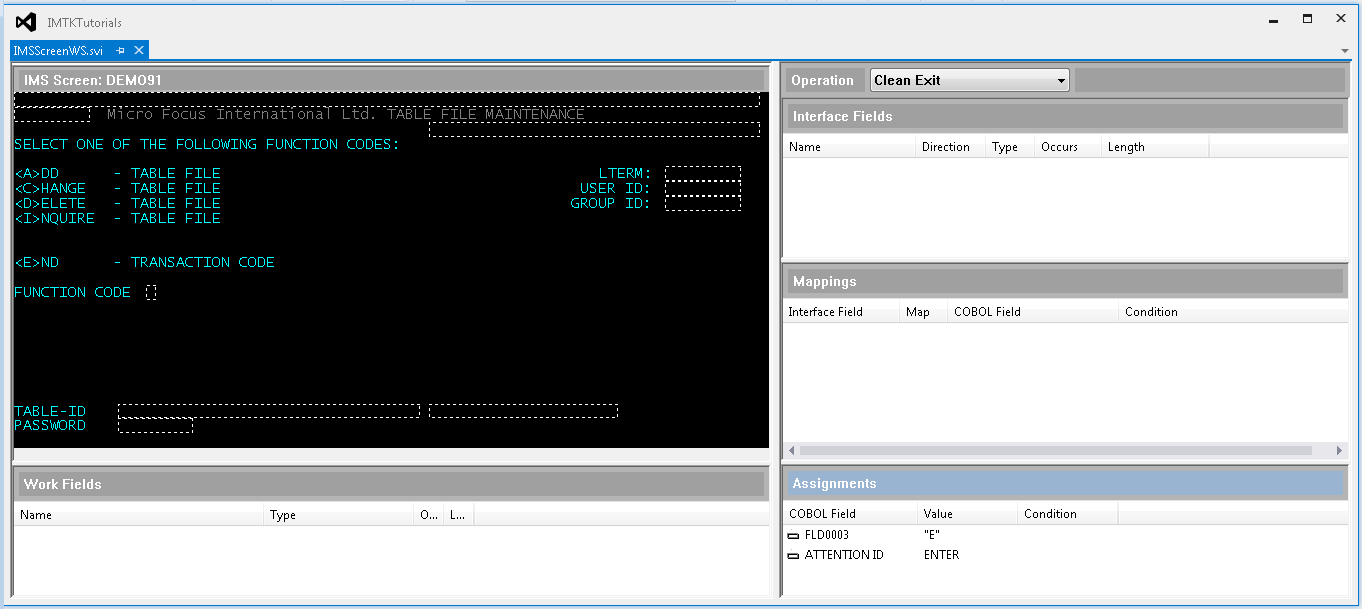
- Clean Exit operation
- In this operation, you supply the application with a value of
E (for exit) for the main menu's
FUNCTION CODE field (FLD0003). This action provides a clean exit from the application.
- Click Operation > New.
- In the Operation Name field, type Clean Exit.
- From the Active Screen drop-down list, click DEMO91. This is the name of the details screen of the application.
- From the Previous Screen drop-down list, click DEMO92 to establish that the path to the active screen is through the DEM092 screen.
- Leave the Transaction ID field blank.
- Leave Create Default Mappings unchecked.
- Click OK. The IMS Screen pane now shows the DEMO91 screen.
- In the Assignments pane, right-click and select New Assignment from the popup menu.
- From the Assign to drop-down list, click FLD0003, which is the name of the FUNCTION CODE field.
- In the Field 1/Operand 1 field, type E, which is the value that tells the application to exit.
- Click
OK.
Once again, you need to simulate the pressing of the Enter key after providing a value for the field.
- In the Assignments pane, right-click and select New Assignment from the popup menu.
- From the Assign to drop-down list, click ATTENTION ID.
- From the Field 1/Operand 1 drop-down list, click ENTER.
- Click OK.
- Click File > Save IMSScreenWS.svi to the service interface.
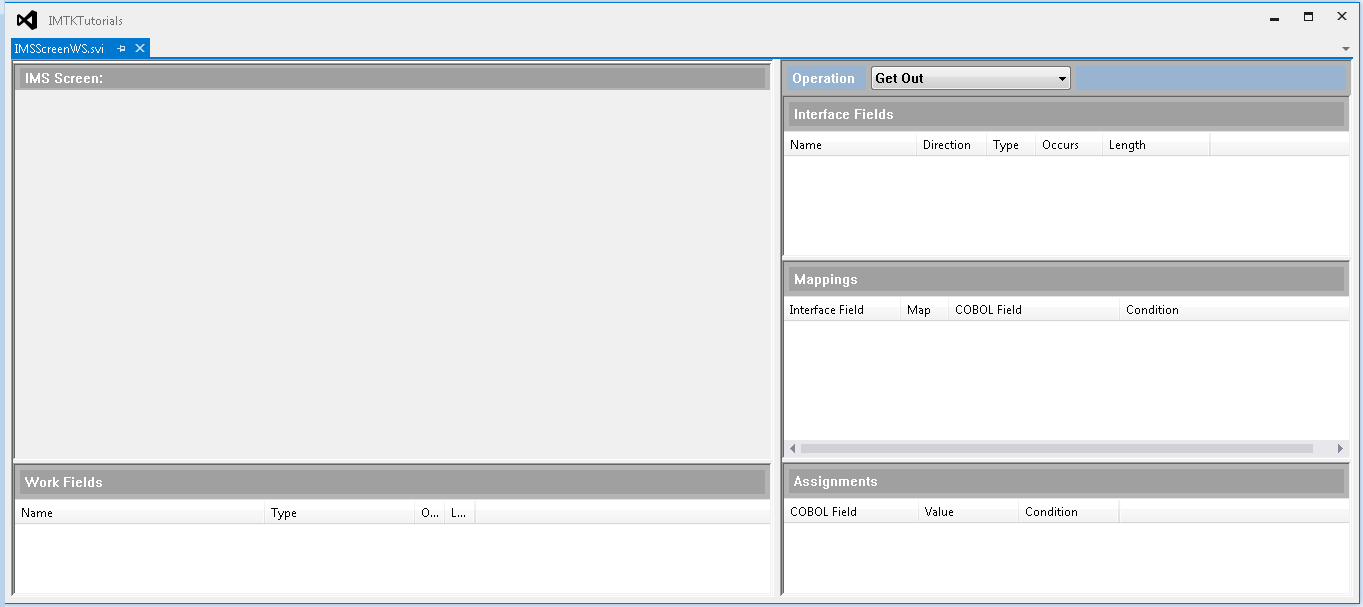
- Get Out operation
- Finally, you need an operation that simply terminates the service if, for some reason, the application screen for any operation does not match its specified Active Screen. This operation is provided as a failsafe only.
- Click Operation > New.
- In the
Operation Name field, type
Get Out.
You need this operation to execute when the active screen and/or previous screen cannot be determined by the service.
- From the Active Screen drop-down list, click ANY SCREEN.
- From the Previous Screen drop-down list, click ANY SCREEN.
- Leave the Transaction ID field blank.
- Leave Create Default Mappings unchecked.
- Click OK.
- Click File > Save IMSScreenWS.svi to the service interface.
You have now completed the IMSScreenWS service interface definition. Click the x on the Interface Mapper tab to close it.